The homeowner of this adorable Ranch called us to turn her house into the home of her dreams, and she was not messing around! She was ready to pack up her bags, move out, and wanted us to give her a call when the renovation was complete (no pressure, haha!). The goal was to create an open floor plan that seamlessly combined the living room, kitchen, and dining room, add more storage space, and of course an island! She was looking for a complete transformation that would allow her to enjoy this home for many years to come.
PROJECT AT A GLANCE:
Location: Burlington, MA
Type of Home: Ranch Style Home Built In 1956
Square Footage: 1,162 Square Feet
BEFORE: When I first walked into the house I could see so much potential, but it was hidden behind oddly shaped walls. The kitchen brought in a ton of natural light, but it was completely blocked by the wall dividing the rooms. Our client also loved the built-ins around the fireplace because her uncle made them, but she knew they may not survive the amount of construction that was going to happen. She entrusted us to come up with something that fit the new space while still keeping the charm and spirit of her uncle’s hard work in the living room!

AFTER: In order to create the seamless open floor plan she desired, we removed the load bearing wall and installed a beam to keep the structural integrity of the home.
![]()
THE BUILT-INS: Once the beam was installed the original built-ins suffered some damage, which was a bummer, but that meant I was able to get creative and come up with something new! What is unique about this fireplace design is that the right side ended up narrower than the left because of where we had to add a structural post, so I decided that we would do something different on each side. It created more character around the wood burning fireplace that was original to the home and I love how the oak mantel adds a warm touch. We were even able to save 2 of her uncle’s doors from the original built-ins and incorporate them back into the new design!
![]()
My favorite design details for the livingroom are the v-groove wall accent and the crown molding.
![]()
BEFORE: The kitchen and dining room were tucked away towards the back of the home. Storage was a major problem; she barely had any countertop space and she really wanted an island. She also had an unheated room in the back of the home that could be transformed into a usable everyday space as an extension to her new open floor plan.
KITCHEN & DINING ROOM BEFORE: You can really see how small and cramped this kitchen was just by how tiny the opening is leading from the dining room to the kitchen!

UNHEATED BACK ROOM BEFORE: It was an adorable space that was closed off from the rest of the house by a door. We removed the door and created a large opening so that it would feel like a natural continuation of the first floor.

THE DOOR LEADING INTO THE DINING ROOM: (By the way, what was up with those diamond grids???)

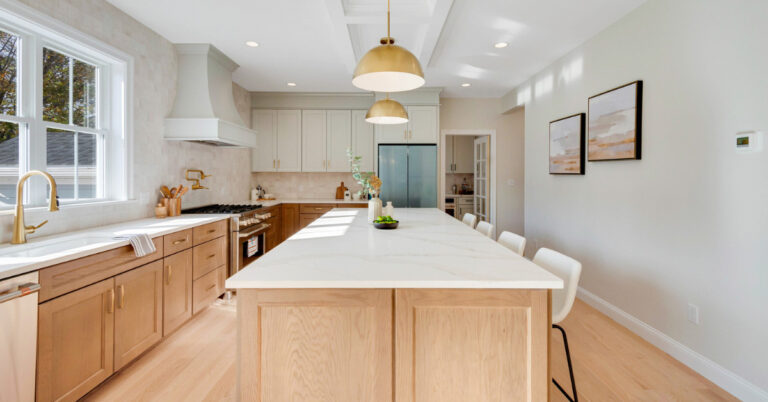
KITCHEN & DINING ROOM AFTER: Removing the wall allowed us to go in and create the kitchen of her dreams! You can also see in the back, where the previous unheated room was, which is now opened to the rest of the first floor and converted into a fully heated year-round room! Within the kitchen, I created a vaulted ceiling to add a little drama when you go from one room of the home to another. A Ranch typically has low ceilings and I really wanted to open this up and bring as much natural light in as possible.
![]()
THE KITCHEN ISLAND: By moving the sink to the island we were able to give her plenty of counter top space to work with next to the stove. The most important part of designing a new layout is making sure everything fits within the space. This island may be small, but it fits her Ranch style home perfectly and provides much needed seating!
![]()
![]()
KITCHEN BEFORE:

KITCHEN AFTER: What a difference! The vaulted ceiling adds so much character and you can really see how much natural light flows into this home once the walls are gone!
Using a white arabesque tile with white grout all the way up to the ceiling helped give this kitchen a clean and modern look! Adding a contrasting island, black lantern pendants, matte black hardware, and a fun accent tile finished off this kitchen design beautifully!
![]()
KITCHEN AFTER EXTENDED: We combined the old dining room space with the kitchen to include more storage, a breakfast nook, and this stunning accent wall! Not only is it a pretty focal point, it’s also very functional. The tall pantries, extra cabinets, and additional counter space will go a long way in keeping this kitchen from feeling cramped.
![]()
I used the same patterned tile for this accent wall as I did over the stove in the kitchen, which helps tie this whole design together!
![]()
THE UNHEATED ROOM BEFORE:
AFTER: By simply adding heat to this room, replacing the diamond window sashes, adding a fresh coat of paint, and some new lighting, we transformed this forgotten about space into any everyday space!
![]()
THE VIEW FROM THIS ROOM BEFORE:
AFTER: We were able to sneak the heat into the stairs! 🤫
![]()
MAIN BATHROOM BEFORE: Everything is this bathroom had to go because it was falling apart!

MAIN BATHROOM AFTER: She was willing to forego a tub in lieu of a full walk-in shower. We wanted this space to feel relaxing, so I went with more subtle tones of blues and neutral colors to achieve that look.
![]()
![]()
The best part about this shower is the crackled glass fish scale tile that has blues and greens in it, which helps create our focal point! I paired it with a vertical subway tile that has almost a watery texture, which really flows with the overall theme of this bathroom!
![]()
![]()
HALF BATHROOM DOWNSTAIRS: The star of the show of the whole downstairs is the black and white patterned floor tile! We rearranged the floor plan in this space in order to make it more functional and add some storage to the back wall. The round black mirror, black hardware, and 3 black & gold sconce lights finish off the look and give this half bathroom some modern flair!
![]()
![]()
![]()
Want to see a video house tour of this finished project? Check it out BELOW!
What To Read Next:
| From Starter Home to Forever Home: An Addition & A Wood Cabinet Kitchen Update
| Remodeling Kitchen Essentials
Looking For Design Tips? Read These Next:
| Fixer Upper Blue Paint Colors
| How Much Does A Bathroom Remodel Cost?
| Top 5 Best Neutral Paint Colors